Android OkHttp源码梳理
OkHttp学习
基础
Android主流网络请求框架,且是Retrofit框架的基础
特性
- 使用连接池减少请求延时
- 使用GZIP压缩减少响应数据大小
- 缓存响应内容,避免完全重复的请求
- 支持HTTP2,对一台机器的所有请求共享同一个socket
特点 责任链模式
基本使用
val okHttpClient = OkHttpClient()
val request = Request.Builder()
    .url("https://www.baidu.com")
    .get()
    .build()

val newCall = okHttpClient.newCall(request)

// 同步方式
// 注意:Android中不能在主线程中进行网络请求,否则会报错
Thread {
    val execute = newCall.execute()
    Log.i("TAG", "okHttp: ${execute.body?.string()}")
}.start()

// 异步方式
newCall.enqueue(object : Callback {
    override fun onFailure(call: Call, e: IOException) {}
    override fun onResponse(call: Call, response: Response) {}
})
源码梳理
阅读OkHttp源码,一定首先带着有建造者模式以及责任链模式的理念去阅读。同时OkHttp4是基于Kotlin编写的,因此还需要掌握一些Kotlin基本语法
初始化
OkHttpClient创建
默认创建
open class OkHttpClient internal constructor(
builder: Builder) : Cloneable, Call.Factory, WebSocket.Factory {
	constructor() : this(Builder())

  init{
    // 通过builder中的属性做一些基本设置
  }

  // Builder中包含一些基本的配置项
  class Builder constructor() {
  	internal var dispatcher: Dispatcher = Dispatcher()
    internal var connectionPool: ConnectionPool = ConnectionPool()
    internal val interceptors: MutableList<Interceptor> = mutableListOf()
    internal val networkInterceptors: MutableList<Interceptor> = mutableListOf()
    internal var cache: Cache? = null
    internal var dns: Dns = Dns.SYSTEM
    internal var proxy: Proxy? = null
    internal var protocols: List<Protocol> = DEFAULT_PROTOCOLS
    internal var callTimeout = 0
    internal var connectTimeout = 10_000
    internal var readTimeout = 10_000
    internal var writeTimeout = 10_000
  }
}
查漏补缺——internal关键字
限制Module间的方法调用,internal修饰的字段或方法只能在该Module内访问,而不能跨module访问,应该是保护API安全性之类的。
通过OkHttpClient.Builder实例创建
// 例子
val okHttpClient = OkHttpClient.Builder()
    .callTimeout(Duration.ZERO)
    .addInterceptor {}
    .build()

// OkHttpClient.Builder
fun callTimeout(duration: Duration) = apply {
  callTimeout(duration.toMillis(), MILLISECONDS)
}

fun connectTimeout(timeout: Long, unit: TimeUnit) = apply {
  // 配置Builder内置属性并
  connectTimeout = checkDuration("timeout", timeout, unit)
}

// 通过配置好的Builder实例构造OkHttpClient对象
fun build(): OkHttpClient = OkHttpClient(this)
Kotlin语法糖——apply
apply: 不仅it指代当前实例,同时还默认返回处理后的实例对象,因此用apply更加简洁,不用再手写return
每一次调用时都会返回一个Builder对象以供下次继续配置
简单回顾一下建造者模式
意图:将一个复杂的构建与其表示相分离,想解决一个复杂系统的创建过程
使用场景:当一个类的构造函数参数个数超过4个,且有一些是可选参数时
解决什么问题:构造函数参数过多不方便;同过set进行注入又可能造成顺序问题
构建请求
构建Request
构建请求时也是使用到建造者模式
class Request internal constructor(
    // 基本属性
    @get:JvmName("url") val url: HttpUrl,
    @get:JvmName("method") val method: String,
    @get:JvmName("headers") val headers: Headers,
    @get:JvmName("body") val body: RequestBody?,
    internal val tags: Map<Class<*>, Any>
) {
    val isHttps: Boolean
    get() = url.isHttps

    open class Builder {
        internal var url: HttpUrl? = null
        internal var method: String
        internal var headers: Headers.Builder
        internal var body: RequestBody? = null
        // 默认采用GET方法并初始哈headers
        constructor() {
            this.method = "GET"
            this.headers = Headers.Builder()
        }

        open fun url(url: HttpUrl): Builder = apply {
            this.url = url
        }

        // 根据Builder返回Request
        open fun build(): Request {
            return Request(
                checkNotNull(url) { "url == null" },
                method,
                headers.build(),
                body,
                tags.toImmutableMap()
            )
        }
    }
}
可以看到此处Request的构建方式与之前OkHttpClient构建方式大致相同,都是通过Builder构造
构建RealCall
通过OkHttpClient根据Request创建实际请求类RealCall,Request相当于只是一个纲要单,给出我想做什么。RealCall相当于是具体的执行计划,给出我该怎么做
val newCall = okHttpClient.newCall(request)

// OkHttpClient.kt
override fun newCall(request: Request): Call = RealCall(this, request, forWebSocket = false)

// RealCall.kt
class RealCall(
    val client: OkHttpClient,
    val originalRequest: Request,
    val forWebSocket: Boolean
) : Call {
    // 连接池,与client绑定
    private val connectionPool: RealConnectionPool = client.connectionPool.delegate
    // 事件监听器
    internal val eventListener: EventListener = client.eventListenerFactory.create(this)
    // timeout监听
    private val timeout = object : AsyncTimeout() {
        override fun timedOut() {
            cancel()
        }
    }.apply {
        timeout(client.callTimeoutMillis.toLong(), MILLISECONDS)
    }
    // 执行状态
    private val executed = AtomicBoolean()
    var connection: RealConnection? = null
    private set
}

// Call是基本的请求接口,实现了请求要具有的基本方法
interface Call : Cloneable {
    fun request(): Request
    fun execute(): Response
    fun enqueue(responseCallback: Callback)
    fun cancel()
    fun isExecuted(): Boolean
    fun isCanceled(): Boolean
    // ...
}
执行
同步execute
// 	RealCall
override fun execute(): Response {
    // CAS检查call是否已经被执行
    check(executed.compareAndSet(false, true)) { "Already Executed" }

    // 开启timeout超时监听
    timeout.enter()
    callStart()
    try {
        // 向client的dispatch提出执行申请
        client.dispatcher.executed(this)
        // 核心方法,侧面接入interceptorchain获取最终response
        return getResponseWithInterceptorChain()
    } finally {
        // 向client的dispatch提出结束申请
        client.dispatcher.finished(this)
    }
}

// Dispatcher(具体的线程调度器,类似于RxJava中的Scheduler)
class Dispatcher constructor() {
    // 默认最大请求数64
    @get:Synchronized var maxRequests = 64
    // 默认每个主机允许发送的最大请求数5
    @get:Synchronized var maxRequestsPerHost = 5
    @set:Synchronized
    @get:Synchronized
    var idleCallback: Runnable? = null

    private var executorServiceOrNull: ExecutorService? = null
    // 最终返回的还是 executorServiceOrNull
    @get:Synchronized
    @get:JvmName("executorService") val executorService: ExecutorService
        get() {
          if (executorServiceOrNull == null) {
            executorServiceOrNull = ThreadPoolExecutor(0, Int.MAX_VALUE, 60, TimeUnit.SECONDS,
                SynchronousQueue(), threadFactory("$okHttpName Dispatcher", false))
          }
          return executorServiceOrNull!!
        }


    private val readyAsyncCalls = ArrayDeque<AsyncCall>()
    private val runningAsyncCalls = ArrayDeque<AsyncCall>()
    private val runningSyncCalls = ArrayDeque<RealCall>()

    @Synchronized internal fun executed(call: RealCall) {
        // 向同步Running双端队列中加入该Call
        runningSyncCalls.add(call)
    }
}

// ReaCall
@Throws(IOException::class)
internal fun getResponseWithInterceptorChain(): Response {
    // 构建interceptor链,后续会介绍该部分
    val interceptors = mutableListOf<Interceptor>()
    interceptors += client.interceptors
    interceptors += RetryAndFollowUpInterceptor(client)
    interceptors += BridgeInterceptor(client.cookieJar)
    interceptors += CacheInterceptor(client.cache)
    interceptors += ConnectInterceptor
    // 不是WebSocket时特殊处理
    if (!forWebSocket) {
        interceptors += client.networkInterceptors
    }
    interceptors += CallServerInterceptor(forWebSocket)

    // 通过之前的interceptor构建第一个InterceptorChain
    val chain = RealInterceptorChain(
        call = this,
        interceptors = interceptors,
        index = 0,
        exchange = null,
        request = originalRequest,
        connectTimeoutMillis = client.connectTimeoutMillis,
        readTimeoutMillis = client.readTimeoutMillis,
        writeTimeoutMillis = client.writeTimeoutMillis
    )
    try {
        // 核心方法
        val response = chain.proceed(originalRequest)
        // Call是否被取消
        if (isCanceled()) {
            response.closeQuietly()
            throw IOException("Canceled")
        }
        return response
    } catch (e: IOException) {
        calledNoMoreExchanges = true
        throw noMoreExchanges(e) as Throwable
    } finally {
        if (!calledNoMoreExchanges) {
            noMoreExchanges(null)
        }
    }
}
好,看到如上位置,流程逐渐清晰,通过call.execute将该call添加到dispatcher的待执行队列中,然后开始通过责任链模式去获取最终执行结果,那么重点就是OkHttp如何通过责任链模式获取到Response呢?
// RealInterceptorChain
class RealInterceptorChain(
    internal val call: RealCall,
    // 重要,所有的interceptor
    private val interceptors: List<Interceptor>,
    // 当前应该执行的interceptor
    private val index: Int,
    internal val exchange: Exchange?,
    internal val request: Request,
    internal val connectTimeoutMillis: Int,
    internal val readTimeoutMillis: Int,
    internal val writeTimeoutMillis: Int
) : Interceptor.Chain {
    @Throws(IOException::class)
    override fun proceed(request: Request): Response {
        // 检查index是否正确
        check(index < interceptors.size)

        calls++

        // 不太理解exchange的作用,后续介绍到
        if (exchange != null) {
            check(exchange.finder.sameHostAndPort(request.url)) {
                "network interceptor ${interceptors[index - 1]} must retain the same host and port"
            }
            check(calls == 1) {
                "network interceptor ${interceptors[index - 1]} must call proceed() exactly once"
            }
        }

        // copy构建下一个待处理的chain (index+1: 交给下一个interceptor)
        val next = copy(index = index + 1, request = request)
        // 获取当前的拦截器
        val interceptor = interceptors[index]

        // 当前interceptor处理下一个
        val response = interceptor.intercept(next) ?: throw NullPointerException(
            "interceptor $interceptor returned null")

        if (exchange != null) {
            check(index + 1 >= interceptors.size || next.calls == 1) {
                "network interceptor $interceptor must call proceed() exactly once"
            }
        }

        check(response.body != null) { "interceptor $interceptor returned a response with no body" }

        return response
    }
}
异步enqueue
// RealCall
override fun enqueue(responseCallback: Callback) {
    // 检查call的当前状态
    check(executed.compareAndSet(false, true)) { "Already Executed" }

    callStart()
    // 包装Call为AsyncCall并入队
    client.dispatcher.enqueue(AsyncCall(responseCallback))
}

// Dispatcher
internal fun enqueue(call: AsyncCall) {
    synchronized(this) {
        // 添加当前call到异步任务等待线程池中
        readyAsyncCalls.add(call)
		// 暂时不研究
        if (!call.call.forWebSocket) {
            val existingCall = findExistingCallWithHost(call.host)
            if (existingCall != null) call.reuseCallsPerHostFrom(existingCall)
        }
    }
    promoteAndExecute()
}

private fun promoteAndExecute(): Boolean {
    this.assertThreadDoesntHoldLock()

    val executableCalls = mutableListOf<AsyncCall>()
    val isRunning: Boolean
    // 加锁
    synchronized(this) {
        val i = readyAsyncCalls.iterator()
        while (i.hasNext()) {
            val asyncCall = i.next()

            // 若正在执行异步任务数量超过规定最大数量,则不继续处理
            if (runningAsyncCalls.size >= this.maxRequests) break // Max capacity.
            // 若当前Call对应主机发送的请求大于最大规定数,则不继续处理
            if (asyncCall.callsPerHost.get() >= this.maxRequestsPerHost) continue // Host max capacity.

            i.remove()
            asyncCall.callsPerHost.incrementAndGet() // AtomicInteger
            // 将call加入到执行的call集合中
            executableCalls.add(asyncCall)
            runningAsyncCalls.add(asyncCall)
        }
        isRunning = runningCallsCount() > 0
    }

    // 对每一个可执行的call通过executorService进行异步执行
    for (i in 0 until executableCalls.size) {
        val asyncCall = executableCalls[i]
        asyncCall.executeOn(executorService)
    }

    return isRunning
}

// RealCall
fun executeOn(executorService: ExecutorService) {
    client.dispatcher.assertThreadDoesntHoldLock()

    var success = false
    try {
        executorService.execute(this)
        success = true
    } catch (e: RejectedExecutionException) {
        val ioException = InterruptedIOException("executor rejected")
        ioException.initCause(e)
        noMoreExchanges(ioException)
        responseCallback.onFailure(this@RealCall, ioException)
    } finally {
        if (!success) {
            client.dispatcher.finished(this) // This call is no longer running!
        }
    }
}
那么这里的executorService到底是如何配置的,在前面OkHttpClient默认Build配置中,在get executorService时,会默认初始化executorServiceOrNull
@get:Synchronized
@get:JvmName("executorService") val executorService: ExecutorService
	get() {
        if (executorServiceOrNull == null) {
            executorServiceOrNull = ThreadPoolExecutor(0, Int.MAX_VALUE, 60, TimeUnit.SECONDS,
                                                       SynchronousQueue(), threadFactory("$okHttpName Dispatcher", false))
        }
        return executorServiceOrNull!!
	}
可以看到这里使用的是SynchronousQueue作为阻塞队列,有关线程池的知识,在Java JUC中已经学习到,如果忘了可以回顾一下再来看这段内容。
SynchronousQueue(同步队列) 不存储元素,只有当前元素出了队下一个元素才能进来。 此处使用同步队列是为了保证网络请求任务尽可能的地做,能做就做,多开线程也没有影响,只要不超过最大限制。也符合此时网络请求的场景(但此处虽然最大线程数是Int.MAX_VALUE,但其实还是在Dispatcher中做了具体限制(64) )
// AsyncCall
override fun run() {
    threadName("OkHttp ${redactedUrl()}") {
        var signalledCallback = false
        // 启动超时监听
        timeout.enter()
        try {
            // 还是之前的责任链调用方式,只是此时位于新的线程中
            val response = getResponseWithInterceptorChain()
            signalledCallback = true
            // 如果成功响应,不抛异常,则调用onResponse回调
            responseCallback.onResponse(this@RealCall, response)
        } catch (e: IOException) {
            // 抛异常,调用onFailure方法
            responseCallback.onFailure(this@RealCall, e)
        } catch (t: Throwable) {
            responseCallback.onFailure(this@RealCall, e)
            cancel()
            throw t
        } finally {
            client.dispatcher.finished(this)
        }
    }
}
其他
陌生类介绍
Exchange
传递单个HTTP Request与Reponse响应对,在ExchangeCodec基础上添加事件分发管理,Exchange负责将请求发出去并读取的具体响应,具体使用的又是ExchangeCodec,Exchange相当于管理工人的老板
ExchangeFinder
尝试为一个Exchange找到一个可用的Connection
ExchangeCodec
编码HTTP Request并解码HTTP Response,相当于是工人
ConnectionPool
RealConnectionPool的代理类,负责维护所有的HTTP Connection,RealConnectionPool内通过ConcurrentLinkedQueue维护所持有的RealConnection
齐全的监听机制
在OkHttp进行责任链机制的调用过程中,有非常完整的监听,对每一次关键操作的执行都要开始和结束的监听回调,但这也带来了一个问题,每次进行传递调用时都需要将该EventListener作为参数进行传递。
责任链机制
回到RealInterceptorChain的chain方法中,具体品味一下责任链机制
可以看到这里大概有这几个责任链。首先交给RealInterceptorChain开启调用,RealInterceptorChain按顺序执行Inteceptor,每个Interceptor执行完毕后,再次调用chain.proceed,以回到RealInterceptorChain以便进入到下层的interceptor调用,底层Interceptor调用完后再逆序执行余下操作,这就构成了责任链的结构,也就是注意两个核心方法
- interceptor.intercept(chain):Response
- chain.proceed(chain):Response
先列出RealInterceptorChain的proceed代码,后续会介绍
RetryAndFolowUpInterceptor
重试重定向拦截器:负责在请求失败的时候重试以及重定向的自动后续请求
// RetryAndFollowUpInterceptor
@Throws(IOException::class)
override fun intercept(chain: Interceptor.Chain): Response {
    while (true) {
        call.enterNetworkInterceptorExchange(request, newExchangeFinder)
        try {
        // 将请求发送给下一个拦截器
        response = realChain.proceed(request)
        }catch (e: RouteException) {
        }
    }
}

// RealCall
// 尝试创建一个exchangeFinder
fun enterNetworkInterceptorExchange(request: Request, newExchangeFinder: Boolean) {
    check(interceptorScopedExchange == null)

    synchronized(this) {
        check(!responseBodyOpen) {
            "cannot make a new request because the previous response is still open: " +
            "please call response.close()"
        }
        check(!requestBodyOpen)
    }

    if (newExchangeFinder) {
        this.exchangeFinder = ExchangeFinder(
            connectionPool,
            createAddress(request.url),
            this,
            eventListener
        )
    }
}
BridgeInterceptor
桥接拦截器:用户与网络之间的桥梁,我们发出的请求将会经过它的处理才能发送给服务器,可以根据Request信息构建Header以及设置响应信息,例如Content-Length的计算和添加、gzip的⽀持(Accept-Encoding: gzip)、 gzip压缩数据的解包。
- 先:主要是对Request Header中ContentLength、ContentType、Host、Connection、User-Agent、Cookies等做一些基本配置
- 后:可能会进行gzip压缩数据
CacheInterceptor
缓存拦截器:根据请求的信息和缓存响应信息来判断是否存在缓存可以使用
- 先:尝试通过请求来创建缓存策略,根据缓存策略查找缓存结果。并根据配置判断是否要直接返回缓存
- 后:如果返回为304且有该响应的缓存,则可以复用部分缓存,并更新缓存
ConnectInterceptor
连接拦截器:负责和服务器建立连接,即打开服务器与主机的Socket连接(TLS验证、证书验证),非常关键的过程都在这里进行处理,包括ExchangeFinder、Exchange与ExchangeCodec在这里进行初始化,同时连接池复用过程也在此处得以体现
- 前:寻找可用Connection(包含复用过程)并创建Exchange
object ConnectInterceptor : Interceptor {
    @Throws(IOException::class)
    override fun intercept(chain: Interceptor.Chain): Response {
        val realChain = chain as RealInterceptorChain
        val exchange = realChain.call.initExchange(chain)
        val connectedChain = realChain.copy(exchange = exchange)
        return connectedChain.proceed(realChain.request)
    }
}

// RealInterceptorChain
// 通过之前创建的ExchangeFinder尝试找到一个可用的Connection
internal fun initExchange(chain: RealInterceptorChain): Exchange {
    synchronized(this) {
        check(expectMoreExchanges) { "released" }
        check(!responseBodyOpen)
        check(!requestBodyOpen)
    }

    val exchangeFinder = this.exchangeFinder!!
    // 尝试通过echangeFinder找到一个有可用Connection的Codec
    val codec = exchangeFinder.find(client, chain)
    // 基于ExchangeFinder与ExchangeCodec创建Exchange
    val result = Exchange(this, eventListener, exchangeFinder, codec)
    this.interceptorScopedExchange = result
    this.exchange = result
    synchronized(this) {
        this.requestBodyOpen = true
        this.responseBodyOpen = true
    }

    if (canceled) throw IOException("Canceled")
    return result
}
// ExchangeFinder
fun find(
    client: OkHttpClient,
    chain: RealInterceptorChain
): ExchangeCodec {
    try {
        // 尝试从ConnectionPool中获取到可用的Connection
        val resultConnection = findHealthyConnection(
            connectTimeout = chain.connectTimeoutMillis,
            readTimeout = chain.readTimeoutMillis,
            writeTimeout = chain.writeTimeoutMillis,
            pingIntervalMillis = client.pingIntervalMillis,
            connectionRetryEnabled = client.retryOnConnectionFailure,
            doExtensiveHealthChecks = chain.request.method != "GET"
        )
        // 创建一个基于该chain且可编码的HTTP Connection
        return resultConnection.newCodec(client, chain)
    } catch (e: RouteException) {
        trackFailure(e.lastConnectException)
        throw e
    } catch (e: IOException) {
        trackFailure(e)
        throw RouteException(e)
    }
}
CallServerInterceptor
阅读这部分源码时,卡了一会,因为一直以为OkHttp底层还是通过HttpConnection发送的,因此一直没有找到具体逻辑,最后才注意到原来OkHttp是基于Socket连接的
服务请求拦截器:向服务器发起真正的网络请求,然后接收到服务器返回响应。这是整个拦截器链中的最后一个拦截器,在这个拦截器中不会再有proceed方法调用下一个拦截器,而是会把拿到的响应处理之后返回给上一层的拦截器
通过Socket进行网络请求的 步骤
- 建立服务器与主机间的Socket连接
- 主机向服务器发送具体请求,例如 "GET /user/login HTTP/1.1"
而在上一步CacheInterceptor中,已经打开了Socket连接,此处只需要通过打开的Socket连接向服务端发送请求即可,此处对请求的处理采用了StringBuffer类似的结构。并根据Socket中Buffer的响应数据,填充实际的Response
此后不会再chain.proceed,因为也没有可以proceed的interceptor了,此时直接返回得到的Response,并逆序递交给之前的interceptor
连接池复用
连接池复用是OkHttp中的一大优势,让OkHttp快于其他一般的网络请求框架。在此之前回顾一下HTTP复用相关内容
HTTP长连接
HTTP1.1之前,HTTP连接都是短连接,即发送一个Request经过TCP连接后,且得到响应后连接就会断开。但在许多环境下,往往请求都发送到相同的几个HOST中,如果每次HTTP请求都要进行TCP三挥四握,则浪费内存与时间。
同时,短连接还可能造成短时的端口阻塞问题,因为服务器在四次挥手后还要等待2MSL(4分钟),此时端口还是处于被占用状态,因此若大量短连接HTTP请求同时请求一台主机,此时很容易造成端口被占满的情况
因此HTTP1.1便推出了HTTP长连接,用请求头Connection: keep-alive表示(默认启动)。即服务器收到长连接的Request在发送完响应后不会关闭该TCP连接,等待一定时间后才会关闭,即节省了重复HTTP请求的TCP三次握手流程以及相关资源创建时间。
清理
如何启动清理线程
核心: OkHttp采用异步线程进行清理
TaskRunner是如何创建的?
class ConnectionPool internal constructor(
  internal val delegate: RealConnectionPool
) {
  constructor(
    maxIdleConnections: Int,
    keepAliveDuration: Long,
    timeUnit: TimeUnit
  ) : this(RealConnectionPool(
      taskRunner = TaskRunner.INSTANCE,
      maxIdleConnections = maxIdleConnections,
      keepAliveDuration = keepAliveDuration,
      timeUnit = timeUnit
  ))
}
// TaskRunner
// Backend其实包含一个ThreadPoolExecutor
val INSTANCE = TaskRunner(RealBackend(threadFactory("$okHttpName TaskRunner", daemon = true)))

class RealBackend(threadFactory: ThreadFactory) : Backend {
    private val executor = ThreadPoolExecutor(
        0, // corePoolSize.
        Int.MAX_VALUE, // maximumPoolSize.
        60L, TimeUnit.SECONDS, // keepAliveTime.
        SynchronousQueue(),
        threadFactory
    )
}

class RealConnectionPool(
  taskRunner: TaskRunner,
  /** The maximum number of idle connections for each address. */
  private val maxIdleConnections: Int,
  keepAliveDuration: Long,
  timeUnit: TimeUnit
) {

  private val keepAliveDurationNs: Long = timeUnit.toNanos(keepAliveDuration)
  private val cleanupQueue: TaskQueue = taskRunner.newQueue()
  private val cleanupTask = object : Task("$okHttpName ConnectionPool") {
  override fun runOnce() = cleanup(System.nanoTime())
  }
}

// TaskQueue
class TaskQueue internal constructor(
  internal val taskRunner: TaskRunner,
  internal val name: String
) {
  val scheduledTasks: List<Task>
    get() = synchronized(taskRunner) { futureTasks.toList() }
  internal val futureTasks = mutableListOf<Task>()
}
该异步线程在两处进行调用
- Put方法:每次Put Connection到ConnectionPool中
- connectionBecameIdle:当有Connection变为空闲状态时
// RealThreadPool
fun put(connection: RealConnection) {
  connection.assertThreadHoldsLock()

  connections.add(connection)
  cleanupQueue.schedule(cleanupTask)
}

fun connectionBecameIdle(connection: RealConnection): Boolean {
  connection.assertThreadHoldsLock()

  return if (connection.noNewExchanges || maxIdleConnections == 0) {
    connection.noNewExchanges = true
    connections.remove(connection)
    if (connections.isEmpty()) cleanupQueue.cancelAll()
    true
  } else {
    cleanupQueue.schedule(cleanupTask)
    false
  }
}
来看一下taskQueue.schedule方法是如何将这个固定的cleanupTask放入Thread并执行的
// TaskQueue
fun schedule(task: Task, delayNanos: Long = 0L) {
  // 对当前清理的task上锁
  synchronized(taskRunner) {
    // 当前taskQueue关闭后,做一些判断
    if (shutdown) {
      if (task.cancelable) {
        taskLog(task, this) { "schedule canceled (queue is shutdown)" }
        return
      }
      taskLog(task, this) { "schedule failed (queue is shutdown)" }
      throw RejectedExecutionException()
    }

    // 如果当前线程已经是未来待执行Queue futureTask中的第一个
    // 否则就将其按执行时间插入到queue中
    if (scheduleAndDecide(task, delayNanos, recurrence = false)) {
      // 则尝试安排该Task立即执行
      taskRunner.kickCoordinator(this)
    }
  }
}

// 判断何时执行
internal fun scheduleAndDecide(task: Task, delayNanos: Long, recurrence: Boolean): Boolean {
    task.initQueue(this)

    val now = taskRunner.backend.nanoTime()
    val executeNanoTime = now + delayNanos

    // 如果这个清理任务已经被安排要以后运行了
    val existingIndex = futureTasks.indexOf(task)
    if (existingIndex != -1) {
      if (task.nextExecuteNanoTime <= executeNanoTime) {
        taskLog(task, this) { "already scheduled" }
        return false
      }
      futureTasks.removeAt(existingIndex) // Already scheduled later: reschedule below!
    }
    task.nextExecuteNanoTime = executeNanoTime

  	// 将该task按指定delay顺序插入到futureTask中
    var insertAt = futureTasks.indexOfFirst { it.nextExecuteNanoTime - now > delayNanos }
    if (insertAt == -1) insertAt = futureTasks.size
    futureTasks.add(insertAt, task)

    return insertAt == 0
}

internal fun kickCoordinator(taskQueue: TaskQueue) {
  this.assertThreadHoldsLock()
	// 如果当前TaskQueue中没有正在执行的清理任务
  if (taskQueue.activeTask == null) {
    // 有等待执行的清理任务
    if (taskQueue.futureTasks.isNotEmpty()) {
      // 将任务加入到准备执行队列中
      readyQueues.addIfAbsent(taskQueue)
    } else {
      readyQueues.remove(taskQueue)
    }
  }
	// 暂时不太清楚
  if (coordinatorWaiting) {
    backend.coordinatorNotify(this@TaskRunner)
  } else {
    // 交给线程池执行runnable
    backend.execute(runnable)
  }
}
到此为止,梳理一下连接池中开启清理线程的逻辑
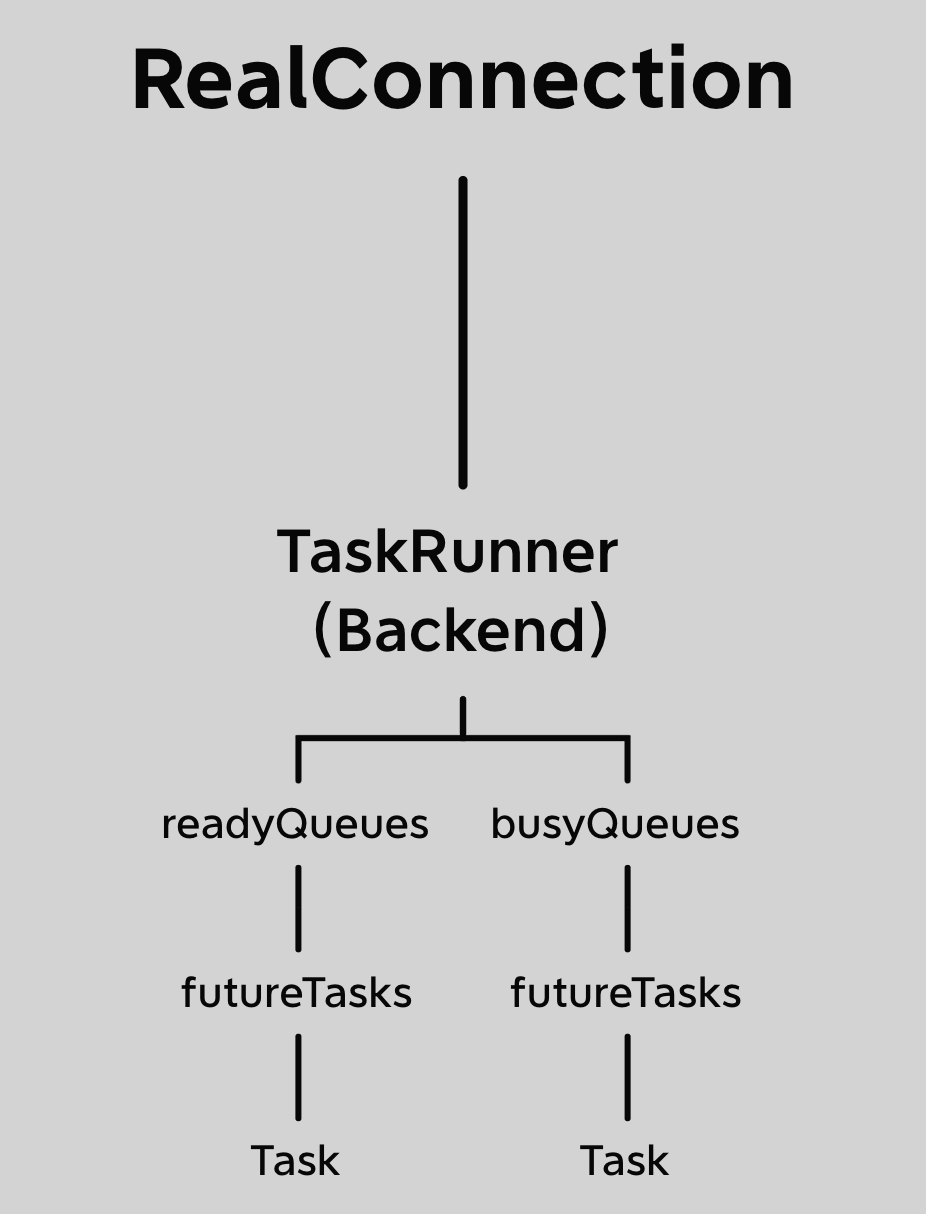
一个RealConnection -> 一个TaskRunner -> 多个TaskQueue -> 多个Task
- 两种调用schedule的入口:
- RealConnectionPool.connectionBecameIdle:当call进行完毕时会调用方法
- RealConnectionPool.put:尝试一个RealConnection放入到线程池时(也就是在RealConnection进行Connect后,此时已于服务端开启Socket连接),通过cleanUpQueue申请调度cleanupTask这个清理任务
- taskQueue.scheduleAndDecide:为task安排在多久进行调度
- taskQueue通过futuerTask查看自己是否已经启动。如果没有启动则进行调度。如果启动了,
- 指定task下次执行时间为指定的delay,并将该该task按照待执行时间插入到queue的futureTasks中,如果futureTask中该task位于队头,则需要立马执行,否则就不管
- taskRunner.kickCoordinator: 尝试将将该TaskQueue(cleanupQueue)放入到TaskRunner中的readyQueues中,并通过线程池去execute TaskRunner中已经初始化好了且已经实现的Runnable。
- 切换到该线程池安排的线程,该runnable中从before、run、after的角度又对清理线程实际Runnable做了这样几件事情(接下来介绍该部分):
- awaitTasktoRun,尝试从readyQueues中获取一个queue并且按顺序获取所有readyQueue中待执行时间最近的那一个task(这里应该基本上都是cleanupQueue的task)。对task进行before处理
- beforeRun:该Task即将被执行,做了以下配置
- 从queue的futureTask中移除该task,说明该queue马上要做了
- 从readyQueues中移除该queue,该queue马上要被执行
- 指定queue的Actvitytask为当前task
- busyQueue中添加该queue,说明该queue正在执行任务
- beforeRun:该Task即将被执行,做了以下配置
- runTask,拿到该task,开始执行真正run与afterRun方法
- task.runOnce: 真正运行清理线程的实际逻辑(cleanup),最终拿到下一次应当进行清理的时延
- afterRun:
- 对当前操作queue设置activieTask为null
- 将queue从busyQueues中移除
- 如果queue还有futuerTask,则readyQueues中再次加入该queue
- 如果指定了还要在指定时间后再次run该task,则调用scheduleAndDecide方法进行调度安排
- awaitTasktoRun,尝试从readyQueues中获取一个queue并且按顺序获取所有readyQueue中待执行时间最近的那一个task(这里应该基本上都是cleanupQueue的task)。对task进行before处理
那么TaskRunnner执行的Runnable是什么?在taskRunner中已经初始化好了
清理线程做了什么
private val runnable: Runnable = object : Runnable {
  override fun run() {
    while (true) {
      // 从readyTask中获取一个可执行的task,可能为null
      val task = synchronized(this@TaskRunner) {
        awaitTaskToRun()
      } ?: return

      logElapsed(task, task.queue!!) {
        var completedNormally = false
        try {
          // 执行具体task
          runTask(task)
          completedNormally = true
        } finally {
          // If the task is crashing start another thread to service the queues.
          if (!completedNormally) {
            backend.execute(this)
          }
        }
      }
    }
  }
}


private fun runTask(task: Task) {
  this.assertThreadDoesntHoldLock()

  val currentThread = Thread.currentThread()
  val oldName = currentThread.name
  currentThread.name = task.name

  var delayNanos = -1L
  try {
    // task.runOnce其实也就是开始执行清理任务cleanup
		// 获取得到下次应该执行清理任务的时间
    delayNanos = task.runOnce()
  } finally {
    synchronized(this) {
      // 从busyQueue中移除该taskQueue,并安排下次清理任务
      afterRun(task, delayNanos)
    }
    currentThread.name = oldName
  }
}

private fun afterRun(task: Task, delayNanos: Long) {
  this.assertThreadHoldsLock()

  val queue = task.queue!!
  check(queue.activeTask === task)

  val cancelActiveTask = queue.cancelActiveTask
  queue.cancelActiveTask = false
  queue.activeTask = null
  busyQueues.remove(queue)
  // 如果不符合清理条件且指定了下次的清理时间
	// 则根据指定的清理时间重新安排该清理task
  if (delayNanos != -1L && !cancelActiveTask && !queue.shutdown) {
    queue.scheduleAndDecide(task, delayNanos, recurrence = true)
  }

  if (queue.futureTasks.isNotEmpty()) {
    readyQueues.add(queue)
  }
}
重头戏cleanup,先理解出发连接池清理的条件:
- RealConnection闲置时间不超过5分钟
- RealConnectionPool中闲置的RealConnection数量不超过5个
fun cleanup(now: Long): Long {
 	var inUseConnectionCount = 0
  var idleConnectionCount = 0
  var longestIdleConnection: RealConnection? = null
  var longestIdleDurationNs = Long.MIN_VALUE

  for (connection in connections) {
    synchronized(connection) {
      // 寻找正在使用的Connection
      if (pruneAndGetAllocationCount(connection, now) > 0) {
        inUseConnectionCount++
      } else {
        // 寻找空闲的Connection
        idleConnectionCount++

        // 计算当前空闲Connection的空闲时间并算出空闲最久的Connection与时间
        val idleDurationNs = now - connection.idleAtNs
        if (idleDurationNs > longestIdleDurationNs) {
          longestIdleDurationNs = idleDurationNs
          longestIdleConnection = connection
        } else {
          Unit
        }
      }
    }
  }

  when {
    // 如果连接队列中最长闲置时间 >= 允许的最大闲置时间
    // 或者闲置Connection数量超过最大允许闲置数量
    longestIdleDurationNs >= this.keepAliveDurationNs
        || idleConnectionCount > this.maxIdleConnections -> {
      // 先清理闲置时间最长的这个Connection
      val connection = longestIdleConnection!!
      // 对Connection加锁再次进行状态判断,以防止多线程下状态不对应
      synchronized(connection) {
        if (connection.calls.isNotEmpty()) return 0L // No longer idle.
        if (connection.idleAtNs + longestIdleDurationNs != now) return 0L // No longer oldest.
        connection.noNewExchanges = true
        // 从连接池中删除该connection
        connections.remove(longestIdleConnection)
      }
			// 关闭该connection的socket连接
      connection.socket().closeQuietly()
      if (connections.isEmpty()) cleanupQueue.cancelAll()

      // 立马清理下一个Connection,这里其实是交给上面的afterRun方法来进行的
      return 0L
    }
		// 如果有空闲的Connection但不满足上述条件
    idleConnectionCount > 0 -> {
      // 下一次安排清理的时间应该是允许 规定最长空闲时间-空闲时间最长的Connection已经空闲时间
      return keepAliveDurationNs - longestIdleDurationNs
    }

    // 如果有正在使用的Connection,那等待指定时间后再尝试清理
    inUseConnectionCount > 0 -> {
      // All connections are in use. It'll be at least the keep alive duration 'til we run again
      return keepAliveDurationNs
    }
		// 连接池中没有Connection,不清理
    else -> {
      // No connections, idle or in use.
      return -1
    }
  }
}